These instructions are written assuming you are using Windows XP and Outlook Express. If you are using a different version of Windows, please contact us for further information. They also assume that you have already setup an Orpheus account for the first time. If you haven't, then you should consult our new account instructions.
Step 1
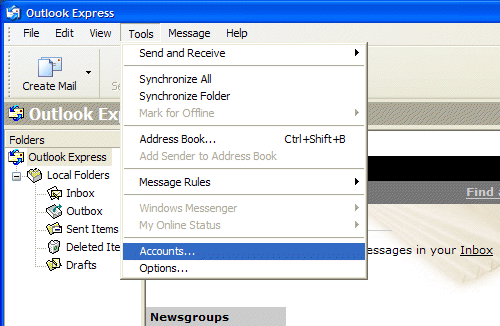
Load Outlook Express and you should see the toolbar along the top of the window. Click on the Tools option and a drop-down menu will appear. Near the bottom of the menu there should be an Accounts option. Click on this option. (fig.1)

Fig.1 - Loading OE and editing mail accounts
Step 2
Amending an existing account

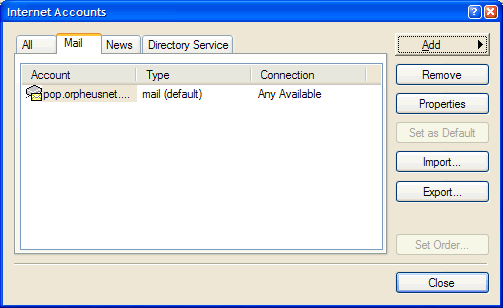
Fig.2 - Select your account
You should see your existing Orpheus mail account listed in the centre of the window, probably labelled something like pop.orpheusnet.co.uk
Ensure that the account is highlighted by clicking on it once if necessary. Once you've highlighted the account to edit, click on the Properties button on the right-hand panel.
Step 3
Amending the name

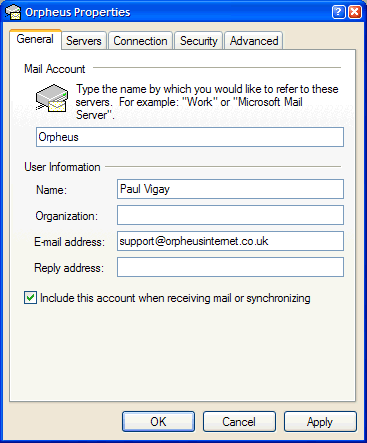
Fig.3 - Amending the name
By default your mail account is probably referred to something like pop.orpheusnet.co.uk in your list of Outlook Express mail accounts. You may want to change this to something more friendly, such as just 'Orpheus'. If so, simply enter a new name at the top of the window (fig.3). This is simply the name that Outlook Express will use to display in the list of mail accounts, so can be whatever you want to identify your account.
Step 4
Checking/Amending the Server names

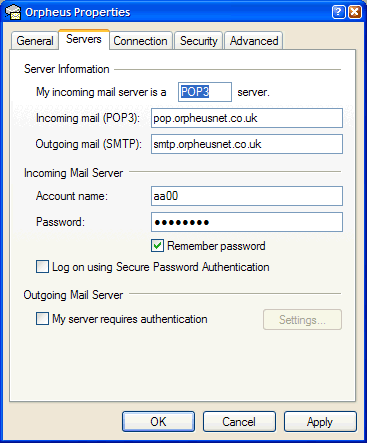
Fig.4 - Checking/Amending the Server names
Click on the Servers tab at the top of the window and you should see the screen in fig.4
Check that the various settings are as displayed in the window above. Check the spellings of the POP3 and SMTP server names. Also note that your Account name and Password are case-sensitive, so if you change them, make sure you've not accidentally left the caps lock key on.
Once you are happy with all the settings, click OK at the bottom of the window. This will save the new settings and return to the internet accounts window (fig.2).
You can now close the accounts window by clicking on the Close button in the bottom right. Outlook Express can now be used to send and receive your Orpheus emails.
If you want to configure anything else on your PC, return to the main Windows support page.
|
Additional Support Computer Systems Game Consoles |